Hello and that you for visiting. My mode of operations are managing cloud environments by use of CLI such as awsconsole (Amazon Web Services), az (Azure CLI) and some gcp-cli (Google Cloud Product). Also by web portal(s).
I have light experience using Terraform and scripting with Python. Windows Powershell is my most proficient language, short of also familiar with Windows CMD and Linux bash CLI.
My background database functionality in projects I have used since Paradox Database v6 when I was 15 years old for a video game store customer and rental system deployment upgrades.
Best practice ideally using PaaS editions of credential and secret management. Access Control is another discipline from when I was working security permissions. Heavy Windows experience and automation. Enjoy some samples on my GitHub.
Got a 12th Gen Intel to go with my prior / other setup with a Gundam board and 11th Gen Intel.
Original post on the forums is here. Formatting likely better there as that is where this post was built from, then added for WordPress front page.
This post is the aggregation and conclusion of about a year of triage on my personal hardware with full details in the linked thread. Jump to the lead, if you have reboots with a high performance graphics card and modern Graphics Card, you may need higher than a 750 Watt Power Supply as was my case. I figured that out on August 4th 2023. So like, a year later.
Fixed this with a new Power Supply. If you get reboots, make sure you have enough power. I had a 750 W that worked for the 11th Gen but was reboot life on the 12th Gen.
I’m on a 4090 RTX in my 12th Gen with a 1500 W now. Still also stable. 🙂
11th Gen and 3090 RTX has a 1000 W PSU now.
Specs for the 12th Gen Intel build ( as of 2023-09-26 ) :
GPU: Nvidia 4090 RTX ( 24 GB ) Display: 5120 x 1440 – 32 Bit colors OS: Windows 11
Honestly so far, the 12th Gen has been a bit fucky to have good temperatures using Corsair H150i Elete LCD and H115i (dual 140 mm fans and radiator). I have a 3090 that runs well but hot damn, long graphics card. By that I mean, most depth used in a case and I had to move radiator upward for depth for cases. Angry 12th Gen Intel.
Keep in mind I only recently resolved the reboots. Power supply was too weak! I had a 750 W PSU trying to run the 12th Gen and a 3090 RTX. This works for an 11th Gen since that CPU pulls around 250 Watts give or take. 3090 will grab 350 W and a 12th Gen can pull about 350 W as well.
Fun fact as the 212 F was not causing reboots but is more due to poor contact with the default CPU Clip. As I mention later in this thread, I added a 12th and 13th Gen CPU socket block to assist in an even mount. Be cautious of over-clamping to not spread thermal compound out from between cooler and GPU, even with CPU support block installed.
Original post continues below:
Corsair Crystal Series 680X is my primary case for the 12th Gen. I still have some airflow tweaks but main goals are re-gooping thermal paste. For a nice thermal cap test, run https://www.userbenchmark.com/ benchmark. I also learned Cyberpunk 2077 also has a benchmark now. It’s in the settings in-game.
The liquid smooth FFXIV Benchmarks are maddening. Baby watches them with me as well.
Speaking on this GPU, check these dimensions. 318.5 x 140.1 x 57.78 mm 12.53 x 5.51 x 2.27 inches
Haha yeah, 330 mm is the max for the Corsair 680X case. 4000x says 360 mm GPU but I would think front radiators would be tight. I moved mine to the top in the 680X case.
Off to operation. Here are some UserBenchmark results from the 11th Gen Intel with a 3050 RTX in here.
Jumping ahead to once I got the Power Supply sorted in 2023-08:
I got my thermals performing better but still see some 212 F / 100 C peak temperatures. However, zero reboots. Been stable since last cooling work on 2023-08-07 (August).
Typical desktop / general use temperatures or light loads while web browsing temperatures on the 12th Gen Intel are 125 F / 51 C to 165 F / 74 C.
Installing the CPU Support block gave immensely better contact with the thermal block to CPU. My thermal applications were even, instead of like a third of the block not making good contact with processor as seen when I would check the spread on the block from prior install. Get one of those for sure if you see similar poor cooling. I was seeing huge spikes to 185 F / 85 C when under Idle and lower web browsing, before I replaced the stock CPU clip. Keep in mind for my use case, this was on 2 different Intel Z690 motherboards. (Asus and MSI)
If your GPU isn’t large, the 12th Gen reboot power supply issues are unlikely. When I put a 3050 GTX in my 12th Gen, it stopped rebooting. That is when I learned the power supply was root cause for instability. The cooling being higher with the higher Watt CPU is consistent on Corsair and Asus AiO kits as I tested that out on both and they performed right about equally, short of the Asus AiO being easier to make better CPU contact, before I added the mounting block.
Welcome to end of my mega thread triaging my main desktop. What a ride.
When I got the bigger power supply in August ( 1500 W upgrade from a 750 W ), I also grabbed an Asus ROG 4090 RTX in the store because I was enamored Micro Center had it in stock.
There is an Evangelion version of the 4090 RTX now but it also costs $2300 last I checked. My $2000 stung enough and I think the Red Asuka card does not look as sick as the Rei Evangelion 3090 RTX. I will keep that one for secondary rig and crunching fun. That cart is too pretty. Granted it launched for $2000 asking price in May 2022 and dropped to $1300 in July 2022 when I picked it up.
Adding some current and final build photos for the 12th Gen Intel desktop too. I had plenty of time working case setups over the last year while tweaking this rig to stable. Also note, the 4090 RTX is even bigger and longer than the 3090 RTX was.
My case is the Corsair 680X RGB Crystal Series case. I actually have 2 since I got this white case and use my other black 680X case for the Intel 4th Gen i5-4690K that is for my Son to play with 😛 He has a 3050 RTX in there I took out of Wifey’s case since she does not game and the Intel GPU gives less hassles for audio out on Linux, as she is a Dev that does not game it up. Don’t get me started on Manjaro and typical Linux to Nvidia support or just like, general audio management and lol pulseaudio.
I actually have a bunch of threads I never put onto this front page. More are from 2019 to 2020 as I have been busy for recent posts. However I do have some backlog items with some progress pushed forward.
As usual, I like to revisit threads where the original posts come from and add additional content. Especially as I learn to have a better understanding of how things work. Break Fix Time is the forum where I start these topics.
The older content will come up through the weekend here on the front page.
Backstory for this thread is I have a project where I want to review SQLite data. SQLite is more a less, a compressed database in a flat-file. Usage tends to be for storing application data, especially in the case of mobile apps. In my case I wish to query quite a bit and to do so across multiple databases. As I have the most database experience in MsSQL, I am exporting data from SQLite so I can place it into a MsSQL Database for better querying and results.
There are a few GUI tools for reviewing SQLite databases but if you want to collect data from them outside of their native application, this is where and why I am exporting and importing the data into Microsoft SQL Server. You could do the same with MySQL and your usage would be slightly different (in the case of using ` instead of ‘ [single quote]). So pick the database platform you are the most comfortable with or like more.
Task 01: Reading the SQLite Database. You can open up the .sqlite in a text editor but as I noted it being compressed, your results will essentially be gibberish characters. While there are some plaintext values, we want the actual raw data set. This will look like your standard database dump / csv / tables view.
Task 02: Running SQLite. Let’s grab a download of the SQLite binary. Pick your OS of choice. In my case I am a Windows main user so I grabbed the sqlite-tools-win32-x86-3270100 windows binary and extracted it to a target folder. Once extracted we will see sqlite3.exe. Get used to running this, as this will get us into the SQLite console.
Task 03: Reading the SQLite database(s). Starting off, let’s grab a copy of the .sqlite file you want to read and paste a copy into your extracted SQLite tools folder. I tried full path loading to my sqlite data file but it was giving me issues. Instead of fighting with that, I just pasted a copy into the same folder as sqlite3.exe we will be running. This is a helpful document on the SQLite website for querying as well.
Once your .sqlite file is in the same folder, bring up a command prompt (cmd.exe) into that folder. I recently learned a nice trick about getting a cmd prompt into a current folder in explorer. Browse to said folder and in the address bar, replace the filepath with ‘cmd.exe’ (without quotes) and you will get a command prompt into that folder. Saving you from changing your drive letter and folder path in the command prompt.
In this cmd window, start by running sqlite3.exe. By doing so your console will change to sqlite> as you are now running sqlite. .help will give you all the available options. Below I will give you a cheat guide in the case of how to: Load a database, select a table, set your export mode and to export the table contents to a flat file! Yeet
.open 'SQLite_DB_in_folder.sqlite'
.tables
.mode csv
.header on
.output filename.csv
select * from table;
.quit
– For the above console / code example, we start by opening the .sqlite database file. – List the tables in said database. – Set our export mode to CSV. – Export with header / column names as first row. – Output results of next line query to target flat-file. – Enter the query with desired table from listed .tables results (You can review these in console by just typing select statement in console, before you enter the .output line). – .quit exits sqlite3.exe console. I suggest exiting after an export or your output file will remain in use by the sqlite3.exe console connection.
Step 04: Review your output then import to MsSQL, etc. Open up your output .csv files and they should look like plaintext output. With that being the case you should be able to import them into the relational database system of your choice and go wild querying away! I should end noting you can also query from the SQLite console too, but since I am looking to compare a large amount of data from various databases, I will import these exported tables into one database on MsSQL with different tables for each.
Note: Your exported .csv will NOT have column labels (unless you follow revised guide). I edited this post and added ‘.header on’ into the commands so our output would have the column names as first row of the .csv export.
Thanks for reading and have fun heccing all the things!
Encoding Guide. Overview on encoding video, stripping audio and preparing to submit a podcast.
Prerequisites: Use whatever OS you like! I have encoded using the same utilities on Linux, but in this case I’m using Windows. Mac support should be comparable as well.
Formatting for WordPress may have flattened some content so you can view the original thread on the forums.
A means to download source stream files. I am using Twitch Leecher in our case.
Since I am talking about Twitch being our source file, I use Twitch Leecher to grab the raw .mp4 file from Twitch.tv servers. For point of reference your 720p video if it is 2 hours, it will be approximately 2.2 GB! Shit, that’s a pretty big file. Your size to time ratio may vary but that puts into perspective the next step. Encoding to .avi files.
Before we start, make sure you grabbed mplayer and ffmpeg. For the Windows heads, let’s make this easy and pick a folder for encoding files. Let’s say D:\encodes
You can set paths and stuf for mencoder and ffmpeg, but let’s be lazy and drop those extracted files into D:\encodes.
As you may guess, we will also copy the raw .mp4 file we want to encode into the encodes folder too.
Next step: let’s prepare the encode scripts. Considering you might be doing this for more than one episode, let’s just gear up to batch this process out for multiple files and to make your task easier, for each new episode.
Pause for giving an overview of our process:
Download the raw file
Encode it with Xvid to trim some of the file size down
Make an MP3 to strip the audio
Run a maintenance task to make sure the timing index (You’ll see why below)
Upload your files somewhere for people to get them
(Optional) Make an XML RSS Feed for your Podcast submissions
Sample Windows Batch file to make an .Avi: @echo off echo Cooking it up mencoder “041_AndrewMorris_GreyNoise_io.mp4” -ovc xvid -xvidencopts bitrate=1800 -o “041_AndrewMorris_GreyNoise_io.avi” -oac mp3lame -lameopts abr:br=192
The 1st .mp4 is your source, I’m setting the bitrate for video to 1800 kbs, -o is outputting the encoded Xvid .avi and the the audio track is being encoded at 192 kbs bitrate for the same .avi output file.
Neat. So now that we have a newly encoded .avi file. Be a good encoder and test it! Granted if one works, you should be golden for your other encodes. Remember, that’s why we are scripting it too. Nice way to save some sanity while gaining consistency.
This will not be an instantaneous process. I want to say my average FPS encoding is about 70 to 90 FPS when encoding the video. So be prepared for that.
Next up: Let’s cook up some tasty MP3s.
In this batch script, we are going to extract the audio from the raw .mp4, but label it as fixTimings.mp3. Try to just run that encoded file and you will see the timing for the track is all broken and randomly changing. that may have been fixed in a later version of mencoder, but I call ffmpeg to fix it. @echo off echo Cooking it up mencoder “041_AndrewMorris_GreyNoise_io.mp4” -of rawaudio -oac mp3lame -lameopts abr:br=192 -ovc copy -o “041_AndrewMorris_GreyNoise_iofixTimings.mp3” echo Sync Audio ffmpeg -i “041_AndrewMorris_GreyNoise_iofixTimings.mp3” -acodec copy “041_AndrewMorris_GreyNoise_io.mp3”
As you can see in the ffmpeg call, I use the source file with bad timings and make a corrected .mp3 with the proper time tables. Luckily, encoding just audio is crazy faster than doing video and audio. On an Intel i7-7700k setup I do about 550 FPS in respect to speeds.
As I mentioned previously about the videos TEST YOUR OUTPUT FILES! Once you have the first few good, you should have no shock or issues processing later files.
Getting into writing an RSS feed in XML:
Let me stop here for now, as the next steps would be uploading your encoded files, writing a RSS feed in XML then submitting that to various podcast services (iTunes, Spotify, Google Podcasts). You can always view source of your favorite podcast (Duh, it should be ThugCrowd) and edit to your whim.
While most web browsers do not display RSS feeds in a nice format anymore besides OG Firefox engine (IE: PaleMoon web browser), you will see the XML displayed that is key to being processed by the podcast services. None of the podcast services host your content, they basically point to your RSS XML feed and the file paths you specify for each episode. So you will want formidably reliable a host.
As I mentioned, there are some specific tags for iTunes you should specify to make sure your podcast gets listed. Out of respect for your listeners, be sure to add the date of episode, file size and track length. It should also help you get listed since you gave good info out of the gate, before submission.
Then when you have a new episode, just add a new Item block with the relevant criteria and you have updates or all your subscribers to know there is a new episode! Ok that is the end of this guide for now.
Sometimes you have multiple files you want to merge into one. In my case I use AviDemux to merge the source video files and export them as a .mkv.
With the .mkv, I run the below ffmpeg to extract the audio track to a new file. ffmpeg.exe -i “S2E19 – Jared Folkins JF0LKINS_video_full.mkv” -f wav -acodec pcm_s16le -ar 44100 -ac 1 “S2E19 – Jared Folkins JF0LKINS_video_full_toWav.wav”
With this .wav, you can edit away in Audacity, then export the edited file as an .mp3.
When I edit, I remove breaks, occasionally adjust volume on really loud portions of audio, remove music tracks for sake of pushing to podcasts and also if there is an interview episode, chop 2 extra audio files. One of the 2 files is News chat, and the other is the interview segment. For sake of flow I also push the full episodes out too, but I know some people really like getting right into the interview as our normal format is 1 hour chat, 1 hour-ish interview.
Ignore below, this was original post.
Been a bit, let’s cook this up cleaner. ffmpeg -i “thugcrowd_s2e4_origAud.mp4” -vn -acodec copy “thugcrowd_s2e4_origAud.aac”
extract the audio from source file as single audio stream, without video.
Ignore the above line, that had somewhat limited results. Here is my current process, after I get the downloaded .mp4 from twitch via TwitchDownloader. Audio-only option will show up a couple hours after your livestream as a downloader option.
– Then open in Audacity. Edit out blankSpace / Break. Typically at the Hour threshold. Can see music with half-spectrum waveForm.
Update xml inserts with below update text replace steps:
<!– edit one of three replacements –> <!– s2e(xPriorNumber) –> <!– this will update title media file urls and guid string for each entry episode –!>
s2e6 <!– Ctrl + R or H to replace unless you automated replace –> <!– replace with –> s2e7
<!– two of three replace –> <!– date url for show notes –>
0709. <!– replace with –> 0716.
<!– three of three –> <!– episode date recorded time –>
,09 Jul <!– replace with –> ,16 Jul
update file zile in middle url update duration time
Below is a sample of the new Items that get added to your podcast.xml base, for a new episode and the 2 split portions. <item> <title>thugcrowd s2e8 – MichaelSLaufer – OpenSource Pharma</title> <link> https://ftbliss.link/dub/thugcrowd_s2e8.mp3 </link> <pubDate>Tue, 30 Jul 2019 21:30:00 EST</pubDate> <description> Show Notes: https://thugcrowd.com/notes/20190730.html </description> <enclosure url=”https://ftbliss.link/dub/thugcrowd_s2e8.mp3″ length=”230546284″ type=”audio/mpeg”/> <guid> https://ftbliss.link/dub/thugcrowd_s2e8.mp3 </guid> <itunes:duration>01:36:03</itunes:duration> <itunes:summary> Show Notes: https://thugcrowd.com/notes/20190730.html </itunes:summary> <itunes:image href=”https://ftbliss.link/ThugCrowd_.png”/> <itunes:episode> s2e8 </itunes:episode> <itunes:keywords> hacking,security,computer,research,infosec,vulnerability,0day,exploit </itunes:keywords> <itunes:explicit>yes</itunes:explicit> </item> <item> <title>thugcrowd s2e8.2 – main chat</title> <link> https://ftbliss.link/dub/thugcrowd_s2e8.2_main_chat.mp3 </link> <pubDate>Tue, 30 Jul 2019 21:30:00 EST</pubDate> <description> Show Notes: https://thugcrowd.com/notes/20190730.html – This is a split edition of the full episode. </description> <enclosure url=”https://ftbliss.link/dub/thugcrowd_s2e8.2_main_chat.mp3″ length=”122466219″ type=”audio/mpeg”/> <guid> https://ftbliss.link/dub/thugcrowd_s2e8.2_main_chat.mp3 </guid> <itunes:duration>00:51:01</itunes:duration> <itunes:summary> Show Notes: https://thugcrowd.com/notes/20190730.html – This is a split edition of the full episode. </itunes:summary> <itunes:image href=”https://ftbliss.link/ThugCrowd_.png”/> <itunes:episode> s2e8.2 </itunes:episode> <itunes:keywords> hacking,security,computer,research,infosec,vulnerability,0day,exploit </itunes:keywords> <itunes:explicit>yes</itunes:explicit> </item> <item> <title>thugcrowd s2e8.1 – news</title> <link> https://ftbliss.link/dub/thugcrowd_s2e8.1_news.mp3 </link> <pubDate>Tue, 30 Jul 2019 21:30:00 EST</pubDate> <description> Show Notes: https://thugcrowd.com/notes/20190730.html – This is a split edition of the full episode. </description> <enclosure url=”https://ftbliss.link/dub/thugcrowd_s2e8.1_news.mp3″ length=”108082154″ type=”audio/mpeg”/> <guid> https://ftbliss.link/dub/thugcrowd_s2e8.1_news.mp3 </guid> <itunes:duration>00:45:02</itunes:duration> <itunes:summary> Show Notes: https://thugcrowd.com/notes/20190730.html – This is a split edition of the full episode. </itunes:summary> <itunes:image href=”https://ftbliss.link/ThugCrowd_.png”/> <itunes:episode> s2e8.1 </itunes:episode> <itunes:keywords> hacking,security,computer,research,infosec,vulnerability,0day,exploit </itunes:keywords> <itunes:explicit>yes</itunes:explicit> </item>
3 Years later from merged thread post:
Podcasts are back up for ThugCrowd. I moved them to another server and updated all files to live in /dub/ folder. The old paths were super-sloppy imo.
The prior post and attached code is episodes.xml from ftbliss.link. For easier review and to see final version of index for Podcast files.
Remember when you host a podcast. You are the bandwidth and actual content. Podcast services just index and load content. Fun stuff as you can get cool domains loading on secure locations, due to the pivot from the podcast lookup main companies and inferred default trust. For the more secured location sites.
I have been doing a bit of PowerShell to configure and interact with various Windows versions. I built up some core scripts to use as my own kind of workshop for system review and administration. I wanted to drop an example script to chat about.
One of the things I struggled to understand starting out was string substitution and being able to define a variable that would also consistently output to a file path of my choosing. TL;DR on that resolution is to wrap the other variable you are calling (example: file paths) in a $() block. As seen below, I call my Computername environmental variable so it can be used in the output of file names and logs.
# Collect service list and current state of each. Get-Service | Sort-Object status | Format-Table -AutoSize | Out-File $outSvc01 timestamp | Out-File -Append $outSvc01
# Get process list with relevant details at time of script exec. cmd /c netstat -aon > $outPorts01 timestamp | Out-File -Append $outPorts01
# Wrap all these output into update state / append single file. # Stamp date and Time into said merged output.
Starting out at the top, I defining a variable for the powershell equivalent of environmental variables in the OS like %computername%. Trust me here, you don’t want to try and call a %variable% in a powershell script. That’s what line 1 is for.
Each of the following defined variables are my output paths for the collections. I use .csv exports for larger data sets, since the default Table outputs can heavily chop data to fit the terminal output.
Brief OCD DBA note. Being a fan of Databases and Microsoft SQL, I really value a good | (pipe) to run:
| Select *
after a command. You can filter that raw output for fields you want to have outputted by writing a custom Select pipe. There is an example of that for Scheduled Tasks, I just wanted to word out the logic as that took me some time to figure out that is how I can see what my options are for selecting output fields.
The other variables for file path are so I do not have to add the same string twice or more. As you can see on the actual commands, I add an Out-File -Append to insert the Date string to each file.
Filter timestamp is my means for defining the date output string. That time will be for when the script is run, so each file will have a matching output time. Think of filter in this context as an easier Function.
The rest of the script uses either Powershell cmdlets or OS level commands to obtain the data I am looking for and saving to the output files. I experimented both ways to see what output best matches the task and output I want to work with.
The Export Events logs are pretty simple in calling the 100 most recent events, saving that to a .csv, then adding the Date string at the end of said file.
Service list is sorted and exported to a .log file with the Date string added (as the date will be added for the other 4 output files as well).
‘ cmd /c ‘ calls a windows command but ignores keywords for powershell on that line. Huge helpful thing to know when trying to process content by use of an OS-level command. Otherwise you will see really esoteric issues you would rather not have to figure out the secret means of why they are failing. cmd /c is quite nice. FYI.
Neat. We are at the part I rambled above in relation to databases and filtering content. I did not need many of the details in the raw output from showing all the parameters of that Powershell cmdlet. Selecting the relevant fields, I then sort based on the TaskPath field (to put the non-OS tasks first in the list), apply a -wrap text for the Format-Table output of that cmdlet, then output the data into a local file.
I have done some scripts with loop and condition evaluations but I will stop here for the moment. If you want to gather some information about an environment, hopefully this example gets you in the right direction for your data collections.
Say you are trying to use Settings | System | Apps and Features but you get an error along the lines of “windows cannot access the specified device path or file. you may not have appropriate permissions” trying to uninstall a program. You can also get a hard error and better search cross reference by clicking Manage optional features when in the Apps and features screen. This applies to Windows 10 and Server 2016. In my case I am on Server 2016 Standard Eval Version 1607 OS Build 14393.2273.
Stepping back on the error, you might thing it a permission issue but in my case I was logged in as domain administrator. Base searching might have you remove and recreate your user profile but that is a waste of time and irrelevant to the issue. Don’t waste your time messing with the profile. You can confirm in Control Panel that using that Programs and Features works without error to uninstall programs.
Thanks to clicking the Manage optional features of Apps and features, I got info on the systemsettingsadminflows.exe to better search against my issue. Thanks to this page, I followed the secpol.msc steps to change a local policy to allow access for ‘Admin approval mode’. Once I enabled that option and did a log out and back in (shutdown -l), I could use the Apps and features portion of settings without cryptic error.
Local Policy
Security Options
User Account Control: Admin Approval Mode for the Built-in Administrator Account
Enable this then logout then back in
Hopefully that helps you avoid the black holes that can be searching for unable to uninstall program in windows with via settings, or similar strings.
Ad Build Guide: Primer: I see quite a few people talk about wanting to do vulnerability research, yet not having much Windows exposure. It could be heavy bias on my part but for the roles i have seen, Windows is pretty dominant in the wilds of the business world. The intent here is to learn more about Windows domain environments by building a test environment of our own to test on. Disclaimers apply to why we want to make a test environment: I really really really do not want to read about you getting arrested for poking a stick at some Windows environment you found in the wild, without having been granted permission to do so. It is really minor effort to find a server with Remote desktop protocol port open to the internet. Granted at this point in time, that should be considered negligence on the part of sites with that port open, but alas, that would not work as a defense for your sake. I have intended to write this guide with a minimal technical background being required, for the sake of welcoming more people to utilize it.
Now that we got out of the way, let us start with the hardware and software used to build your Virtual Machine lab. + A modern desktop or laptop running an x64 processor. You can be running Windows, Linux or OS X for your desktop operating system, as we are going to use VirtualBox to build the VMs. The following guidelines can be applied to your Virtualization platform of choice, but I like VirtualBox for sake of cross-OS Virtual Machine migration and price point for running VirtualBox. + 16 GB RAM or more is preferable. You could get by with less but may find your VMs running low for resources and have less options for multiple, concurrent running VMs. + A SSD drive. Running on an SSD will greatly speed up time to copy an existing VM and also improve desktop performance of the VMs. You can get by on a HDD, but you will wait much longer to clone a virtual disk image and your virtualized desktop OS might be laggy.
Getting started, we want to install VirtualBox, make sure VT-x support is enabled (likely a BIOS setting you can set when your PC is booting up) and to download Windows Server 2016. We could go with older versions of Windows and poke those with a security stick, but if you are trying to get some viable business experience, I would jump into the more recent OS, particularly as many businesses have been lagging on their migrations from older Windows Server versions. There is no shame in learning and trying to also be marketable at the same time.
VirtualBox:
https://www.virtualbox.org/wiki/Downloads
Windows Server 2016
Download the ISO image. https://www.microsoft.com/en-us/evalcenter/evaluate-windows-server-2016/ This will give you a 180 day trial install. So long as not doing so on the Domain Controller server with that role active, you can Sysprep the install to reset the timer and OS back to it’s initial state. More on that further in this guide.
While those download and you install VirtualBox, let’s step back to overview your intent with this test lab. We are installing an initial Windows Server 2016 virtual machine. Once that is up, we will clone that image so we have a master control image. For the sake of this lab, let’s leave the Master image intact then create 4x master clones. I’m going with 40 GB disk size for the VM, so roughly 200 GB will be used.
Master Image (Do not change once all patched)
Windows Domain Controller
Microsoft SQL Server
AppServer. This is optional if you want to save space and piggy-back your potential test application from the SQL VM.
Client machine. Not necessarily on the domain. This will be your client device / scan box / non-domain network sniffer.
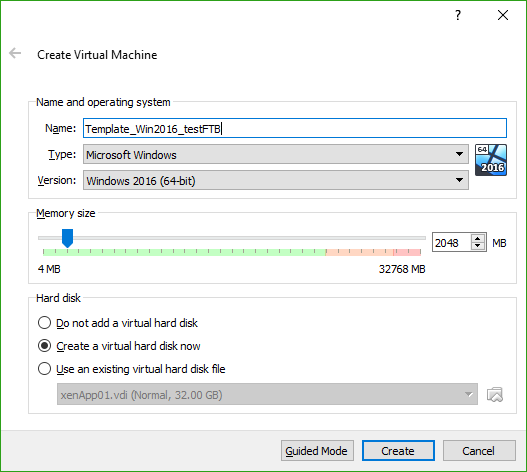
Let’s get started: From VirtualBox, click the New button to create a new Virtual Machine. Type: Microsoft Windows, Version: Windows 2016 (x64). Name this initial VM ‘masterControlImg’ for sake of reference. Click the box for ‘Create a virtual hard disk now’. Let’s set the Memory option to ‘2048’ AKA 2 GB. Then click ‘Create’. I want to add a note that the virtual machine name you enter here will also be the subfolder in your VMs folder for VirtualBox on your storage drive (on your actual main machine). You will get weird errors if you try to make a VM the name of a folder that already is in that folder. FYI to save you headaches on that note. Next will be the Create Virtual Hard Disk screen. Leave the path as-is since it will match the prior line about being in a folder named to your VM, ‘File size’ of 32 GB is fine (but I suggest 40 GB for when you start adding Active Directory services and Replication), ‘Hard disk file type’ to the default of VDI (VirtualBox Disk Image) is good, as is the ‘Storage on physical hard disk’ remaining set to Dynamically allocated. Good, now we can press ‘Create’ on the virtual hard disk screen.
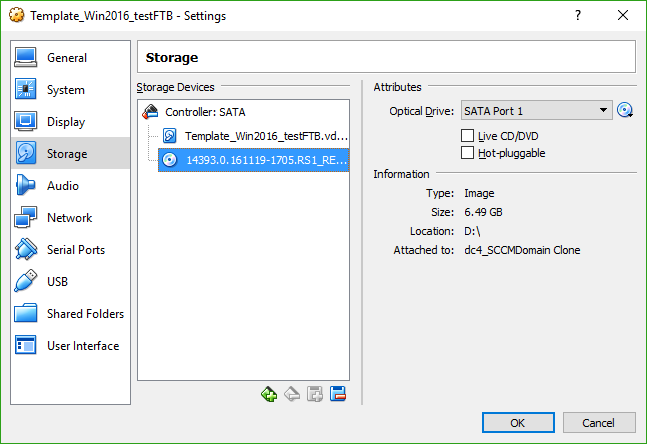
Now that VM is created, let’s go into it’s settings then onto the Storage tab. The second drive should be a CD icon and on the right side you will see a drop-down when you click the CD icon. Select ‘Virtual Optical Disk File…’ then browse on your local computer to where you saved that Windows Server 2016 ISO, click OK until you are back to your VMs listed on the ‘Oracle VM VirtualBox Manager’.
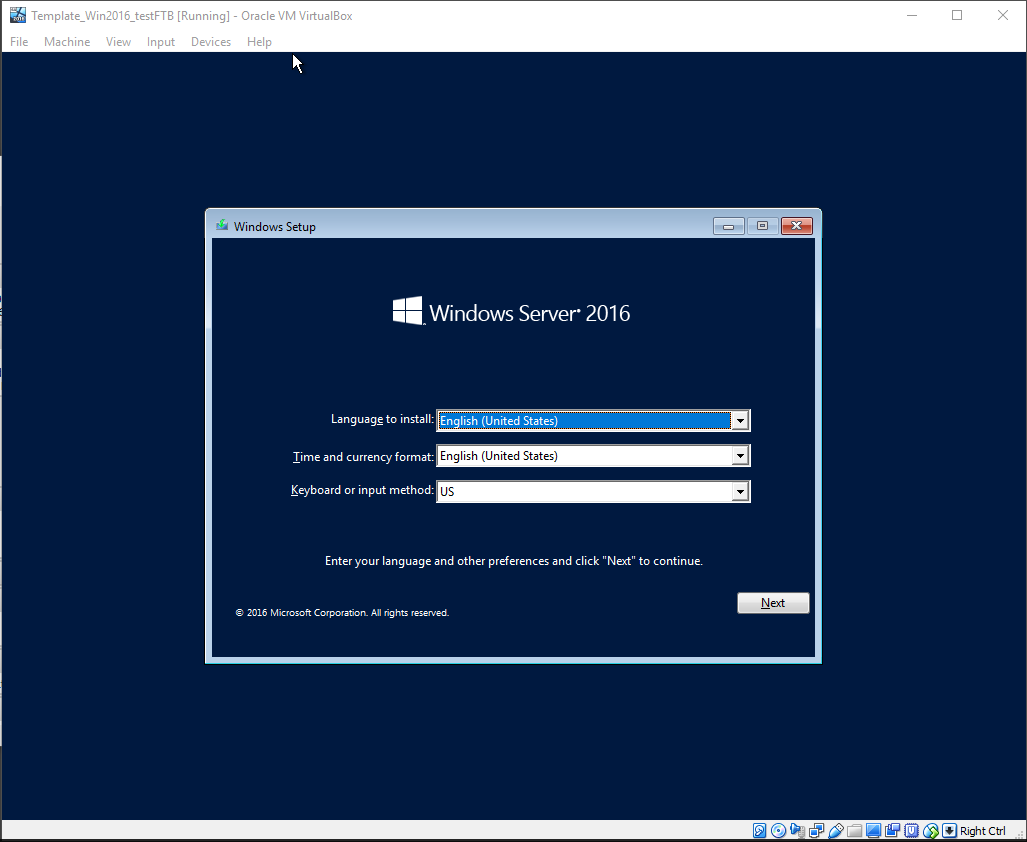
With the ISO mounted for Windows Server 2016, boot your VM to install. Hurry up and wait. Follow the prompts (you want Server 2016 with desktop experience) and select an Administrator password. For the sake of this lab, we can use ‘Babydonthurtm3!’ without the quotes. You will want to take note of this for later use, as this is the local administrator account for this install and your cloned virtual machines. Wait for the installer to finish and when done, it will let you login and see your desktop.
Now the install process for Windows begins.
End of the Windows install process. Let us login to this VM.
Minimize Server Manager for now. We do not want to add any roles or features yet.
Clicking the Settings Gear, we want to install Updates for our Template OS.
This will likely take quite some time. Better to do it now than to need patching every other machine we make as well.
Install the most recent windows update patches, reboot and log back in. Once the patches finish, shut this VM down. Avoid booting this VM into windows, since it will be our Source VM for new instances. Then back on the Oracle VirtualBox VM Manager, go to Settings for your VM, then Network. Change the Attached to from NAT to ‘Internal Network’. You can make a custom name for ‘intnetLab01’ for ease of reference later, if you expand your VM labs. This setting will allow all the other VMs we spawn to communicate with each other. If you forget to do this step later for other VMs, come back here if you wonder why your VM cannot see the Active Directory Domain Controller.
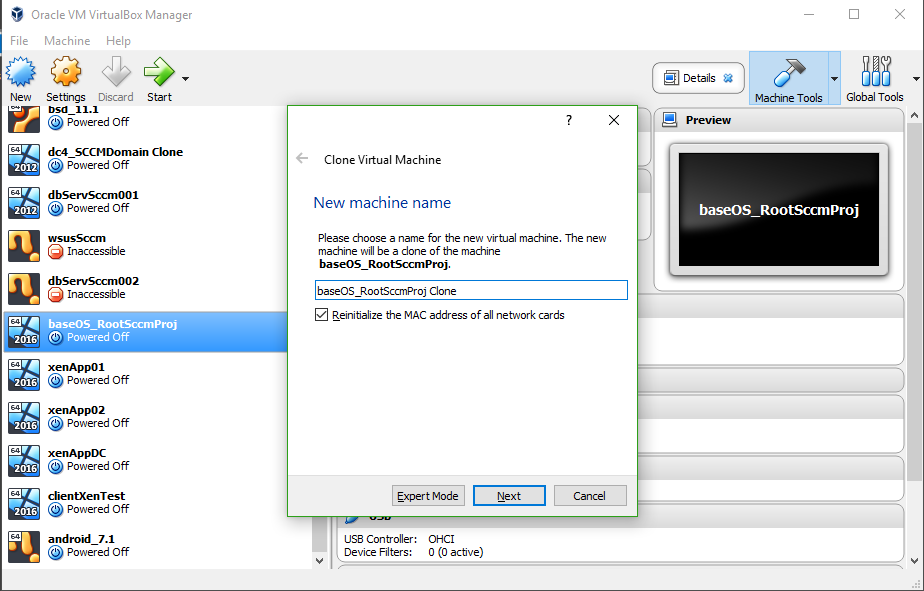
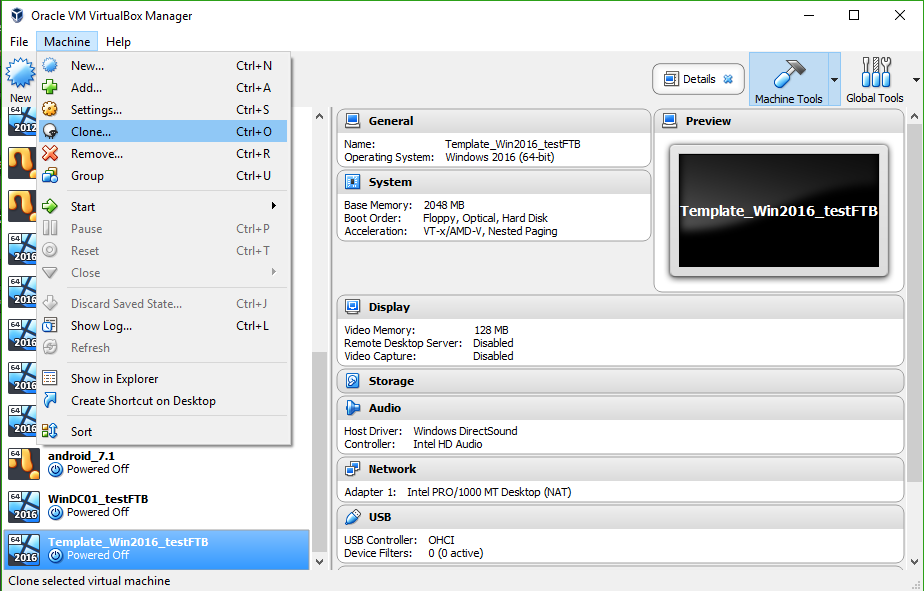
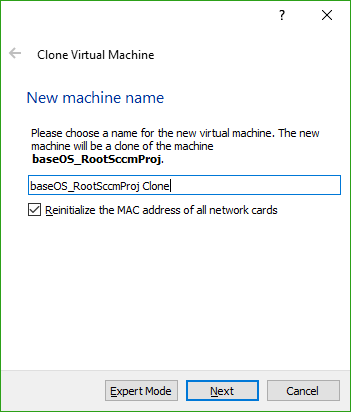
Clone machine image prompts:
With all of this done, let’s make a clone of this VM. We will name this Clone ‘WinDC01_testFTB’ or the like, as it will be the Primary Domain Controller for our Windows Domain. Be sure to check the ‘Reinitialize the MAC address of all network cards’ because you do not want the same MAC address trying to talk to another computer. That would also cause issues with DHCP and all sorts of networking issues you do not want.
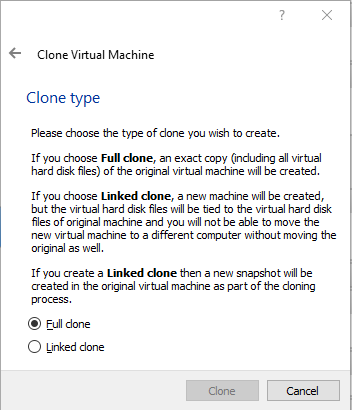
You do want to make it a Full Clone instead of a linked clone. Wait for the clone process to finish, then boot up your newly spun ‘WinDC01_testFTB’ VM.
Log in to the desktop. Before you get started making this a domain controller, we want to SysPrep this machine. The action of this command will make it seem like a new windows install with the most important result being it will have a new SID / Windows Install ID. As you dig into active directory, you will see AD links the machine name to it’s install ID / SID as a unique identifier. If that didn’t make a lot of sense, know that running Sysprep will allow us to join each of our copied VMs into this test domain, without machine conflict issues.
Click Start and then Run cmd.exe. If it’s not prefixed with ‘Administrator: Command Prompt’ in the title bar, click Start, type cmd then right-click to Run As Administrator. In this prompt type:
cd %systemroot%\system32\sysprep
then type:
sysprep /generalize /oobe
A brief prompt will come up as it prepares your install then it will shut down the VM. Once that happens, start the VM back up and it will take you through a prompt similar to when you installed the OS. Once done, you will be back at the desktop. If it asks for an Administrator password again, take note of what you use and write it down. You are welcome to use the Haddaway example from above again. Jumping back to the Sysprep process, you will need to do this for each image you clone from your VM template. I also wanted to mention %systemroot% that is an environmental variable in Windows. If you get to writing scripts, environmental variables are quite the blessing to your sanity. You can use them in powershell to some extent also, so the fun pays off there. Final ramble about SysPrep. If you try to do this on an Image that had AD Roles and Features installed, it will likely not re-activate the 180 day trial for Windows Server and if it was an AD services image, it will likely error on the sysprep process. That’s why we have our base image 🙂
Let’s wrap this up getting you a domain created. Starting off, let’s set this machine to have a Static IP Address. In the TaskBar down in the lower right by the Time, right-click the Network icon and then click ‘Connections’: Ethernet. On the Ethernet status page, click Properties then Internet Protocol Version 4 (TCP/IPv4) In the screencap you can see I went with: 10.0.2.10 on a /24 Subnet (AKA 255.255.255.0)
Pick a default gateway that will be the same for all other VMs made, intended to connect to this AD setup. For the DNS, I put it’s own IP but 127.0.0.1 (loopback) works too. If and when you add a second DNS and AD Server, I highly advise making your second DNS server be the IP of that other DC. It will make domain fail-over really easy and reliable if you shut down your primary DC or practice a patching cycle like as would be done in a production setting.
Another good thing to do, is Changing the Computer Name. By default it will be something like ‘WIN-StringofTextandNumbers’. For sanity’s sake you can rename this to ‘WinDC01FTB’ or something more descriptive. To change the computer name, bring up an Explorer window then right-click on ‘This PC’ then select Properties. Click Change Settings to change the Computer name, then reboot as it will ask you to do.
When you run the AD wizard without setting a static IP address, it will give you a warning about resolution issues. So that’s why we took care of that before using the Server Manager to add roles and features. Take my word on it being annoying to change a computer name, once you add roles and services. Planning to do the PC name change before adding roles will save you headaches.
Since we are in VirtualBox, select Devices menu then the ‘Insert Guest Additions CD Image’ if you would like to use options such as ‘Shared Clipboard’ and ‘Drag and Drop’ files. Once the image is mounted in your VM, run the installer from it’s CD drive then reboot when it’s finished as it will prompt. This is helpful for when you want to get or send files and text to the VM and your actual desktop machine. Unless you like manually retyping scripts, I’d suggest adding these Guest Addons.
I am going to present a bit of a shortcut / cheat. Instead of clicking lots of next boxes, we can supply the config options by use of Powershell. The below is the script I saved from the Wizard when it presented ‘Export Configuration Settings’. You can run this in a Powershell ISE window or save it to a text file and add a .ps1 on the name to make it a powershell script.
This should let you spawn your Domain as if you entered these values in the Wizard. In this setup we are calling the domain ‘Hivelan.int’, with a classic domain name of just Hivelan (for Window NT level old support). On a reboot you should be able to login to the Domain you just created.
From here, the virtual domain is your oyster. You can make another clone of your Template machine, sysprep it, then join it to the domain. Since we didn’t add the DHCP Server role to the current DC, go into your IP options and set all the IP info the same, except the IP address where you want the last octet (4th block of 3 digits) to be different than .10. Then once on the same IP Space (your 255.255.255.0 subnet, means you can have an IP of 10.0.2.1 – 10.0.2.254). Go into System Properties on this new VM. Change your Computer name if you wish but the real objective is to change from a Workgroup to a Domain. Enter ‘Hivelan.int’ as your domain and it should prompt for the Administrator account and Password. You can always make a second domain admin account if you wish, but that boils into using Active Directory Users and Computers in Administrative Tools.
Once you add this machine to the domain and reboot, jump back into the Server Manager to add the Active Directory Domain Services on this machine, but we will say ‘Add to an existing domain’. Click Next until it’s finished.
This guide got a little longer than I intended but I will stop here for the time being. You can then make another clone of your Template VM and use that as a machine not on the domain. Give it an IP address in the allotted space and you can use that for running Wireshark to see what kind of traffic you see. You can then add that machine to the domain or make another VM clone to see how the traffic differs for a machine that is added to the domain.
Hopefully that helped get you into a test Windows environment and gave some help on getting started with VirtualBox. If you have the funding and another Virtual Machine platform you like more (like XenServer or VMware), most of the concepts and options should be transferable and have similar naming.
Say you are checking you tasklist output for a certain Windows process id (pid) that matches your netstat -o output. These commands are helpful but matching the output can be annoying, even if you output them to a text file. By the way, context wise this process is a throwback to the Bitcoin Miner Malware removal thread, as it could help for any open port you want to reference back to a running process.
If you want to see what said PID in your netstat output is with a single CLI string, here is a helpful pipe option. tasklist | findstr “PID#”
IE: running tasklist | findstr “812” on my system throws details on wininit but also shows other process IDs with 812 in them.
I think of this as a light grep-like command you can do in Windows. Like Linux, ‘|’ (piping) will take the output of your first command and run the 2nd command against it. The tasklist find is a common and moderately easy grep-like thing you may want to do often if you are checking a machine for open ports and trying to correlate what process details are for said PID linked to those open ports.
I will edit this over time but I wanted to have the thread up to start with.
Overview objectives: – Stop camera from saving GPS to photos. – This is in your Camera App Settings, not System device settings. – Device Settings: – Lock Screen and Security: – Set lock mode and passcode to unlock device. – Password, PIN, Pattern, Swipe, None. – Biometrics. Face, Iris or Fingerprints – I do not use or particularly like any of the biometric means for device locking. – App Shortcuts: Define what apps can be used while phone is locked (IE Phone calls and Camera) – Find my mobile. Anti-theft and traacking options for your phone. – Remove controls: Allows phone to be remotely controlled via your Samsung account – Google location service. Allow GLS to give more accurate location info to where your mobile is. – Send last location. Allow your phone to broadcast last location when battery hits a certain level of charge. – Encrypt SD Card. Your files on the SD card will only work with your phone. If phone is reset to defaults, you will not be able to read the encrypted files anymore and would have to re-format the card. – Secure Lock Settings – Secured lock time – Auto factory reset. After 15 failed passwords (will also erase all your data on phone) – Lock network and security. Prevents disabling Wifi and mobile data when your phone is locked, to make someone stealing your phone easier to track by device. – Notifcations. Choose to hide notification messages on lock screen. – Define what apps can put notifcations on the lock screen. – Hide content of message on lock screen from displaying. (Highly suggested to be on) – Notification icons only. Just show app icon without details, on lock screen.
– Device Settings – Location – Turn GPS on or Off. Besides privacy and tracking being less accurate, this can save a large amount of battery life. Turn this off when not needed for directions. – Google Location History. You can disable this from saving where you have searched and have been. – Google Location Sharing. Can share ‘Real-time location’ with someone of Google. You can turn both of these off and GPS maps will still work fine. The sharing and history are not needed, just GPS being turned on.
– Device Settings: – Apps. – See installed apps – Review and define App-specific system-level Permissions granted to device. – Decide if you wish to disable some apps completely or uninstall them. – Review battery usage and mobile data use, per app.
– Device Settings: – About phone. – Shows phone number, model, serial number and IMEI. – Software Information. – Show Android version – Android patch level – Various system level information.