Categories
Software

OS X screens and updates

I have done some maintenance on Mac laptops before and have a Mac Mini myself.  I haven’t had any issues with the Mini, but I did with a 2015 Macbook Pro.  Initial issue was some screen damage that looks like a residue stuck on the screen.  Turns out that was an issue with some Mac models, including the Macbook Pro 2015 model due to the anti-glare coating they used.  Fortunately, since they got their laptop at an Apple store, they had 4 year coverage and the repairs were free.  There is also a recall / free replacement for the logic board.  That repair was $575, before the cost was zeroed out because a warranty repair.  The new screen was crystal clear again and the laptop continues to soldier on.  We got this repaired in January of this year.

Item NumberDescriptionPriceAmount Due
S1586LL/ALabor Charge, PBG4/MBP15″$ 100.00$ 0.00
S5741LL/AFlat Rate 2 Repair Charge MBP15/MBP17$ 475.00$ 0.00
Total (Tax not included)$ 575.00$ 0.00

Lo and behold, I was visiting a couple days ago, and the same MacBook Pro (2015) rebooted to give the following error:
[auth] failed to write file <private>
At the bottom of an error log display.  if you have an nvidia MacBook Pro 2015) and update to 10.13.4, you’re gonna have a bad time. https://discussions.apple.com/thread/8338509

I followed the suggestion to select the Boot Disk option, then to pick the Mac Hard Drive to have it boot normally.  This 10.13.4 issue looks to have just started again the other day (5/30).  Hopefully an update will address this, because a recovery log screen is pretty daunting, especially for someone who does not normally see error logs, as I will generalize and say is the case for many Mac users who do not work in tech.  Needless to say they were happy when I got it to boot back up and she will continue delaying the prompts to install updates on OS X.

Categories
Hardware Software

Forensic drive imaging with dd

Raspberry Pi dd imaging guide.

Preface:
This guide is for sharing a forensic approach to imaging a hard drive or solid state device.  I tend to not see many forensically tooled guides, so this one covers imaging from the perspective, that you need a verifiable image of a drive you will be working with.  I am writing it will full intent to be useful without needing to have a Write-blocker or needing to run and wait for the sha256 signature checks to be run.  In effort to be accessible I will cover the imaging of a Raspberry Pi with Raspbian and getting that running.  If you are familiar with that process, please jump ahead to the Action section.
My logic for using a Raspberry pi is because they are some of the cheapest functional computers one can get.  My logic for imaging the Pi fresh from an ISO, is to be sure no extra data is left over on the Pi from any previous projects you might have been doing in the past.

I want to add a side-note that you can follow the steps under action for almost any Linux distribution on various hardware.  I have done similar on a current era laptop running Tails before.  Your CPU heavy tasks like sha256sum will likely run much faster than on the Pi 2 I used for this guide. USB hard drive performance may also run higher based on your USB drive connectors and laptop, versus a Raspberry Pi 2.  Just for point of reference, I wanted to mention this.

Preparation:
Tools needed:

  • Raspberry Pi
  • SD Card
  • A USB to MicroSD reader (to image your Pi)
  • Power Supply
  • HDMI Display
  • Keyboard and probably a mouse
  • Post-It notes to label your drives
  • A USB powered hub (you want this for use with the external drives)
  • A USB SATA Dock
  • USB Write-blocker to prevent making changes to source drive. (or you can use a second USB dock but cannot count on the full unchanged integrity of the source USB drive.)

As I mentioned the Write-blocker, that will increase your cost quite a bit. Roughly $300 if you are going to use a Cru ComboDock 5.5 that I use.  You are still fully able to follow this guide without one, but minor changes to your source drive may happen while you read data from it (especially if you browse the drive contents and it generates thumbs.db files) and that would cause a problem in the sake of capturing a forensically sound image of that source drive.

With that noted, let’s get the Raspberry Pi ready to go with a fresh install of Raspbian OS.

Download latest Rasbian to your main computer you are reading this from.
Install to sd card with etcher imager (resin.io is the imager I used to write the .iso to MicroSD Card)
Put sd card in your Pi and boot it up.
Bring up a terminal and set pi passwd (default password is: raspberry)
Raspberry Pi Configuration can be found under Preferences on the menu of Raspbian Desktop.  On this first tab of System you can change the bottom options:

  • Disable auto login
  • Boot to CLI

Now that we have the Pi booted and setup, let’s jump into the Actions portion of the imaging.

Actions

Hook up source drive (If no write-blocker, use a USB drive bay / or external drive).  Follow the below steps to identify your source drive.
No gparted on Raspbian anymore, so use Parted in the terminal.

sudo parted -l

Typically the first usb drive will be /dev/sda.  Also cross reference the output to make sure it matches to the size of the drive you just hooked up. (500 GB source drive in my case)
You can also  type ls /dev/sd* in a terminal to see what drive is connected.  Now that we know what the source drive is, go ahead and hook up the destination drive you are using to be the clone of your source drive.
In another terminal, type sudo parted -l again.  In my case I now see a /dev/sdb.  This is my second drive I will be using to write the clone of the source drive to. (1000 GB destination drive in my case)

For your sake, this is where I recommend using post-it notes to write a note to put on each disk, stating what one is the source and it’s /dev/path.  Also doing the same for your destination and it’s /dev/path.

Source drive is /dev/sda
Dest drive is /dev/sdb

With that out of the way, we are ready to jump into the long haul of running  a dd command.  This will copy the data from your source drive, block for block to the destination drive.  dd is quite a serious command and can result in data loss if you do it wrong.  Here is where a write-blocker is especially useful to prevent overwriting the drive.  Also this is where the notes on the physical disk are helpful.  Below is the command for the setup we outlined.

dd if=/dev/sda of=/dev/sdb bs=16384k status=progress

Let’s break this command down.  I look at the if= being equal to Input file.  That’s our source drive.  of= being Output file.  This is where our destination drive is being overwritten.  bs= is Block Size.  I go with 16384k as it is a block size I have seen around good for imaging.  status=progress is a nice add-on so you can see the results of the dd command.  Otherwise you would be waiting for the progress to output once it is done.
This will take quite some time. 500 GB source to a 1TB destination drive.  Easily took about 8 hours as the finished results state:
27184.1 s, 18.4 MB/s.  Divide that by 60, then again by 60 and I got 7.55 hours to image a 500 GB drive to a 1 TB drive.
Hurry up and wait as you are doing a block for block image, so it even will copy the blank space to the destination drive.

Once done, verify each drive matches (Especially for forensic sake and use of write blocker).
Drive to drive sha will not match, so you want to do it for the partitions specifically.  Once again, be warned that it took around 7 hours on this Pi setup to run sha256sum against each one of these partitions.  Below are the commands I ran to generate the sha256 signature, followed by their matching results.

sha256sum /dev/sda1
sha256sum /dev/sdb1

813dcb6470f62c7c12623a0ef092551965b83e501e70dff4e01e1220cebf0129  /dev/sda1
813dcb6470f62c7c12623a0ef092551965b83e501e70dff4e01e1220cebf0129  /dev/sdb1

Bingo!  Image is a success and the source partition is a match to our cloned partition.  For conversations sake, if you were to run sha256sum against the entire disks, they would not match up.  Keep in mind the destination drive I used is a 1TB disk, so it has more free space than does the source drive.

Here are examples of mismatched checksum, because we compared the entire disks where one was larger than the other.

83b3b53d577d0ae793c947220b4ef3aa3d323e8349e0d3615b77964ec5baeb80  /dev/sda
f24189b6160b9a91bf5037ade4d4ab2f45a9bad9ebe254c0a349688f8987bc10  /dev/sdb

That concludes this guide.  If you have an questions or feedback, reply in this thread or hit me up online.  Thank you for reading and visiting. :)
Original thread

Categories
Software

Firefox transparent glitch headless

This is a weird mix of conditions, so let me start with the overview. You are logged in remotely and most everything works fine, except Firefox. Extra details are that I changed the input on my LCD last night, so technically it’s a headless display since my Windows 10 PC does not see an active display hooked up.

Extra rub with that, is my normal display is running DisplayPort. When I switch inputs to HDMI to play Switch games, my open program windows resize to native resolution for Windows 10 (1024×768 iirc). Back to the issue at hand, over a remote session firefox does not load.

Stepping back, I figure this is related to the GPU hardware support, but its failing since there is no active display. I would turn that off in the program, but well, it doesn’t load beyond a transparent window. How else is there to change the program configuration? prefs.js has the option flags we want to change for disabling hardware rendering.

You can use the system variable to get into you AppData folder by typing %appdata% in a cmd prompt or into the file path of an explorer window. Once in your user AppData roaming folder, you should see Mozilla\Firefox\Profiles\{random}.default.
In that folder, open prefs.js with a text editor.

Keying off this guide, I was able to add the below 2 lines to my prefs.js (making sure Firefox is not running while doing so)


user_pref(“layers.acceleration.disabled”, true);
user_pref(“gfx.direct2d.disabled”, true);


After saving the file then loading firefox, I was able to get a working browser without an active display. Weird glitch to keep in mind if you are running a headless Windows 10 install. Be in intentional or on accident.

Categories
Software

BitCoin miner investigation and removal

This thread is from 2014 but is one of the more technical exploration threads on the forums.  With the recent surge of browser bitcoin miners, I figure a re-look at botnet miners makes for good reading.

Botnet Removal Overview

This thread is an overview on how to detect, identify and remove a botnet infection. This is merely one example of such an infection. Honestly the main reason I was able to detect it (before it was added to malware definition databases), is because of it’s aggressive processor use. Bitcoin miners are extremely intense processes, to 98% CPU usage stood out like a sore thumb.

This will be a 5-step & thread process on how I went about checking around and figuring out how this bitcoin miner was operating. There are various ways to go about the same methods, but I am sharing mine, in hopes it helps someone remove similar trash in the future. I will make a post in this thread for each process, to help describe the methods used, and hopefully do so in a clear manner.

Steps used:

As for any infection, you have to be formidably sure you completely removed the infection, otherwise you are waiting for more damage down the road. Do you wish to reinstall the OS, or do you feel confident the exploit has been removed? This question is especially relevant in the business environment. Luckily I saw this on my personal machine, so I could afford more time to debug what was happening and log it.

The attached picture should make more sense as you read each progressive step.

Sample Bitcoin Miner

Suspect and Detect

Tools used:

This is a Windows 7 Ultimate platform, but all versions should have the commands I listed. You will want to download the XVI and Process Explorer utilities, since they are 3rd party applications.

You can use the GUI Task Manager, but some processes can hide from that display. Also be sure to check “show processes from all users” on the Process tab, if using the GUI list. Sorting by CPU and / or Memory usage is a quick means to find anything with a big footprint. Look for anything you do not recognize. If you are not familiar with standard processes on your machine, search online to find what each process is normally used for. However do not simply assume all standard sounding services and processes are legit.

In this case, MSDT.exe was running. Typically this is a Microsoft diagnostic tool, however that was not the case this time. Using 98% CPU, this program was actually a bitcoin miner and was not an actual microsoft utility. Trying not to jump ahead too much, verifying the path this was running from, validated my suspicion.

C:\Windows\Service\Profiles\Local\Service\AppData\Roaming\Microsoft\Windows\Templates

In the GUI (Graphical User Interface) Task List, you can right click a process and say Open Location This is where I found this executable, as well as 2 other related files.

  • atieclx.vbs (Service spawning vbs code)
  • aticlx.exe (Command and control server, from what I could tell of hex edit)
  • RAVClp86.exe (Communications portion associated with Command and Control server)
  • Network TrafficThis step what a 2-fold operation.Step 01:Closing all web browsers, email clients and the like, I ran the following command.

    netstat -o > C:\2014-06-08_PortList.log

    Everything on the left of the “>” operator displays the open ports in a command window. The “>” operator and file path, saved the results to the filename located on the root of my C: drive. This works with many to all DOS / command line commands and is advised for archiving sake. Open the text file for your results. Look for funky results.

    In this case, I found the following IP (replace letter ‘o’ with number 0 for the IP address. 2o8.94.24o.162:4768

    After the ‘:’ would be the port it was running on. A PID will also display for open ports in the netstat output.

    Step 02:

    Checking Process Explorer for processes running open network traffic. Since I had my Suspect process list of 4, I went to right-clicking one of them and clicking the TCP/IP Tab. Please notice the other 2 items appeared to be spawned via a wscript.exe process. Note that RavClp86.exe was still there as well.

    (Process Explorer image attached to this post)

    Process Details via ProcessExplorer

    PID to Process Explorer mapping

    Similar to the above Netstat command, I wanted to log my running processes to a flat-file for archiving and review.

    tasklist > C:\2014-06-08_ProcessList.log

    Of particular relevance is the ‘Image name’ and ‘PID’ (Process ID). The PID is going to be used in correlation to your Process Explorer investigation. When using Taskkill, you will also know if a process restarted, by it having a new PID. Speaking of TaskKill, here is how you run that command, by entering said PID for the program in question.

    taskkill /pid 3916

    3916 being the PID for the process explorer screenshot in my prior post. You need to substitute this with the relevant PID on your local machine.

    However, simply killing the processes is not enough. As I will cover in the next post.

    Service, Payload and Command and Control targeting

    OK. So far we have a list of 4 deviant processes, but not much clearly established on how they are operating. This point (or actually earlier as well) is a great time to get XVI going. We want to peek at the flagged executables to see if anything telling is occurring.

    (XVI Hex Edit of RavCLP86.exe pictured)

    Hex Display 03

    In this image, we see some Port communications in a seemingly innocuous local file name. Considering this is running in a profile folder, it is indeed not innocent a process at all. From what I can tell, this (in conjunction with Aticlx.exe) process is the Command and Control portion of this application. It also handles being spawned from the .vbs file in the same folder. When any of the other files are removed, this process will re-write them back out and reload them into a running state.

    Here are the contents of the aticlx.vbs. This (Aticlx.exe) would be a normal process… if I owned an ATI graphics card, and if it were not running from the shady profile folder. That is until we see what this file is doing.

    Hex Display 04

    Set objSh = CreateObject("WScript.Shell")objSh.Run "C:\Windows\Service\Profiles\Local\Service\AppData\Roaming\Microsoft\Windows\Templates\atieclx.exe", 0

    So this Service runs to keep Aticlx.exe running. This is the core C&C of the exploit. Respawning the sub-processes as described above. The Service mode running enables the executable to restart, upon termination. Helpful in the event of a user killing the process, and also if there is a code update via the infection botnet. They would want it to be remotely killed, updated and restarted in some instances.

    Potential Removal

    Notice the Potential wording. This will be a case by case basis, where you assume to have tracked down all sub-threads and related infection vectors. If someone had access to your machine, it is a very good assumption that another possible infection method was added. So explore heavily.

    In this case, I would TaskKill, use Process Explorer, and monitor the output folder of these programs. In the case of TaskKill and deleting the infected files, they just came right back. Continuing, I played around until I noticed what .exe respawned the purged files. Aticlx.exe, IIRC.

    To temporary mitigate this, I made a blank text file, then renamed it as the target file. Once the service spawner was prevented from making it’s related protective .exe files, I was then able to stop and prevent the main process from spawning new copies.

    For historic reporting, I renamed the original files to a non-exe filename. Thus preventing them from running, yet keeping a copy for detection and analysis. As I said, this is why you have to judge heavily if you indeed removed the infection. In my case, I was able to run a benchmark to see vastly improved performance. Slower system performance was the tip of the hat, that lead me to investigate this in the first place.

    RATs (Remote Access Trojans) have a nearly invisible footprint compared to a Bitcoin miner, so you will be vastly looking harder for those level infections. I have heard the command line Tasklist shows hidden processes that can be masked in your task manager, but nothing is foolproof. The effort to remove malware and exploits from a machine will always be an uphill battle. Hopefully this guide made enough sense to help anyone new to removing these infections. Also it would be nice if it helped any veterans remove these infections as well, since some of this process may not be traditional malware removal.

    Most of all, let this show you how limited signature based detection systems are. MalwareBytes did start finding this infection (PUP.optional.PrimeMiner) sometime around January 2014 or so. However I am not so sure it also removes the subsequent processes associated with it.

Categories
Uncategorized

Post archive back

As you may notice, I rolled back to WordPress.  Many of the hardware threads have been posted here, from the forums.  This page focuses on hardware and computing topics from the forums, while FuntimeBliss.com will cover gaming with anything else included.

I will back fill some interesting threads from this year as well, since all the content comes from the forums, then gets posted here on these front pages.

Thanks for visiting!

Categories
Software

Desktop Window Managers

I enjoy using multiple operating systems. I love Linux for performance but I have to say most of the window managers are nowhere near Windows or OS X in terms of control and keyboard shortcut operations. This is very rant filled of an opinion, as I do quite a bot of text editing work and am a huge user of Ctrl+Tab and Ctrl+Shift+Tab to navigate between multiple open windows. If may seem minor, but when editing multiple bash scripts, having to select your other window with the mouse instead of jumping tabs by keyboard… is clunky.

I guess the burden of choice also leads to an inconsistent UX in Linux distros. I would say we should step back and know that this is a limiting factor to having people fully switch from Windows or Mac OS. That stuff really matters over time on your day-to-day computer usage. Personally, I tend to manage my Linux installs over SSH from a Windows box, or occasionally a Mac as well. Hopefully this comes to become a little cleaner an operation on some Nix ditros, but as I mentioned, it’s difficult to get everyone to agree. One person’s issue is another person’s workflow to it working as intended.

This rant came up encoding videos, where my bash scripts were not simply a Ctrl+Tab, followed by a Ctrl+R to replace strings for the next output. When you are grinding out the repetitious stuff, shortcuts are helpful and can lead to better automation too. Depends on what you are up to, but the emphasis on a clean UX, is what gets people to invest (mentally and emotionally) to your platform.

Categories
Hardware Software

Pi-Hole config guide

Pi Rasperry Pi-Hole config quide:
Howdy and welcome to another thread.  I have a history of not being a fan of advertisements and do not run those banners on this site.  Besides a security concern, I think advertisement gets really creepy online.
Pi-Hole is an Operating System with dns capabilties and use of adblocking lists.  The added benefit of the request being denied even without plugin-based web browsing, is pretty handy.

Before you install, be sure if you are using a RaspberryPi or whatever device, that your user password is one of your own.  You do not want to go default with your LAN traffic.  If you wanna log a fun time, you can use one of these for short-term logging a little CTF monitoring style.  Logs are configured to purge after a few days on your standard Pi-Hole install. Please be sure to update your OS image with latest patches via said package manager.  In my case I set the primary network connection to a static address.  I have the service connection IP address details to use the actual router as DNS server.  Since all your other network DNS will be set to the fixed IP Address you bound to your Pi-Hole installed device.
SSH is likely disabled.  I like to administer my SSH session by serial to usb in the case of my Raspberry Pi installs.

Follow the install guide and advisory on their site about the bash | pipe install.  Quick comes at a trade off when you do not review the install process part for part.  If you go for the easy install and read the disclaimer, you can run the single line install:

curl -sSL https://install.pi-hole.net | bash

This thread is for administering and keeping yours updated, as with my configuration I ran into update issues using just the one connection.  Details ahead cover enabling a second connection to fetch updates, since you will have the primary network connection with a set IP address that handles DNS requests handed off from your router / main DNS device on your network.

To do updates to the OS and Pi-Hole local web services device / OS, I disable the service network connection to resolve conflicts of web requests to get out locally.  All the LAN clients will be fine getting pages.  In this case, I suspect the localhost calls in the Pi-Hole logs relate to my network layout and the device being bound to serve back to itself.  When logged into the [deviceIP]/admin configuration page I would also get failures to resolve list update servers.

Having plugged in a second USB NIC or using Wireless as an update connection, I ran the following commands to handle my network adapters.  Turning off the static address service NIC. In most cases likely eth0 as shown below

sudo ifconfig eth0 down

Do some pings and the like to see they should now resolve.  Do your updates etc for the OS.  In my case, Raspbian on a Pi 3.

Once those finish, load up the Web Admin panel for your Pi-hole install. Get your ip address for the active network connection with:

ifconfig

Connect to that IP address in a web browser and add ‘/admin’ into the address bar at the end of the IP Address without the quotes around the path.

Login with your admin password to the admin panel and you should now be able to see updates are pending.  You need to start with the FTL update.  To do this, return to your SSH session.  As I mentioned I am working with serial over USB, but you can enable SSH over network if you so desire.  One more service for a network heavy component, so choose of your own accord in concern to security to conveinence.
On that SSH console, run:

pihole -up

Wait for the updater to get and deploy the new FTL version.  You will likely also be treated to the Web Interface and Pi-Hole version also being to current revisions.  Great!  Almost updated and running live AdBlocking again.
Still on your console, seeing the update completed you want to turn back on the main network connection we disabled for updating.

sudo ifconfig eth0 up

Overviewing network setup above:
Main Internet router will be your DNS server on the Pi-Hole device.  Manually set client DNS or change your DHCP server to set client DNS to the static address of your Pi-Hole install. (192.168.0.1 default-ish router)  Check your current IP config to get details if you do not know current network base configuration.
On the Pi-Hole install, set the primary network adapter to an address in that subnet (say 192.168.0.10)  Make sure DHCP server /or/ router will not also try to assign that address in it’s pool.  The Pi-Hole DNS primary will be set to your local router (as above default-ish router 192.168.0.1)

I hope to have avoided huge gaps or inflected confusion in this thread. Jolly adblocking.  Even if you like making money from it, you have to know it is a vulnerable vector and kind of a shaky market.  I’m not here to tell you what to do, I’m sharing details to help block them on places that run them without respect to visitors.

Categories
Uncategorized

Community resources and projects

I want this to be short, yet more detailed than a tweet or lost in a string of them. I have to say there is an issue with contributing to a public project, that is when you are eternally expected to maintain said thing. Especially with no compensation or expectation of support timeline. I know that can sound rude, but the context I am especially honing in on, is stuff like game mods or application support by a person or community, that the OEM / vendor ignored.

There comes a point when if you want to improve something or add features to it, you need to roll up your sleeves and figure it out yourself, instead of ranting on reddit for someone who did a kind deed of the original contribution, to somehow become the permanent dev to your whim. This applies to games as well, because it seems like smaller developers get bombarded with this syndrome, while a major game studio just gets a shrug and ‘oh that’s the best we will get from them’ replies from the same people making outlandish demands from the smaller developers and studios.

Sharing another story, I know a person who wrote a Gamefaqs guide and still had people emailing for intricate details about a thing, 9 years later. I’m sorry (but not really sorry), people probably moved onto other projects, especially in that span of time. It seems like if you give a huge effort, you are presumed to own it forever. Don’t get me wrong, kind people do pick up the torch on projects and move forward, but the issue of insane expectations is a real thing.

If you can ask the question and understand the basic of how something works, if you apply some effort into research and working out the problem, you can likely contribute, if not completely solve the issue itself. I feel many people get burnt out trying to contribute to communities for reasons like this. Throwing in a video game trope; when I played Final Fantasy XI heavily, many of the newer members always showed up for the leet boss fights, but were never to be seen or magically went afk, when the core team was farming triggers (items required to actually fight the leet bosses), because the trigger part takes time and does not directly lead to an immediate reward.

That ends my rant. Please be courteous of people who produce content and products to help others. Donate them some loot for good work, if you want to help debugging and giving feature requests, do not write snarky comments about how dumb they are for omitting your favorite feature. Especially because it may already be there, you just didn’t see it or it has another name for that flag option.
I don’t know about you, but working a day job, upkeeping around the home, finding time to spend with friends and family, getting some recreational and sleep, can be a struggle. Especially when day job requires after-hours maintenance. Please be cool to others. If someone is releasing a tool or something cool, remember they are people too, or at least some sort of advanced AI that probably has some feeling registers too.

Let’s try to avoid pushing people to burn out faster. It’s hard enough to avoid without the crowd heckling that can be this social media age. Thanks for reading and visiting :)

Categories
Software

Technolust save file

I have been playing VR games and decided to take a plunge into Technolust.  Some of the reviews were hit or miss, but if you actually explore around the game and appreciate all the options and content, you may enjoy it nearly as much as I have and continue to do.  I wanted to start noting how much I enjoy it, as this is why I jumped into repairing a save issue I had.

You can save in the game but I had an issue where each time I loaded the game back up, it looped me to the intro portion, instead of the MURC teleport menu you should see, after having saved your game.  I shared some of this info on the Oculus forums and Steam once I got a fresh file to work with saving.  Quoted below.

Quote

Checking my save file, located at:

C:\Users\[username]\AppData\LocalLow\IRIS VIRTUAL REALITY\Technolust 0_9_9_9
I was seeing my save file has a modified date last from Tuesday the 15th, despite my playing later in the week and saving at payphones (and seeing it say saved on the map screen).
In the “save.txt”. Viewing it seems to be largely plain-text. I’ll move it and see if the game making a new copy resolves the save issue.

The contents of my save file look accurate with areas I have been, but I’m confused why it fails to load. It’s almost like there is a borked character in the save file or something. Here is line 01:
ý~Hilltop Score string

Also of note (but not related to the crash) there are some registry values too. These appear to match from my game play.
Computer\HKEY_CURRENT_USER\Software\IRIS VIRTUAL REALITY\Technolust 0.9.9.9

I moved the flat save file and let the game make a new one.  New file does not have the ý at the start of file.  In-game saving also worked after doing this.  Registry still has my high scores from the arcade.  Game loads to teleport MURC menu instead of intro now.

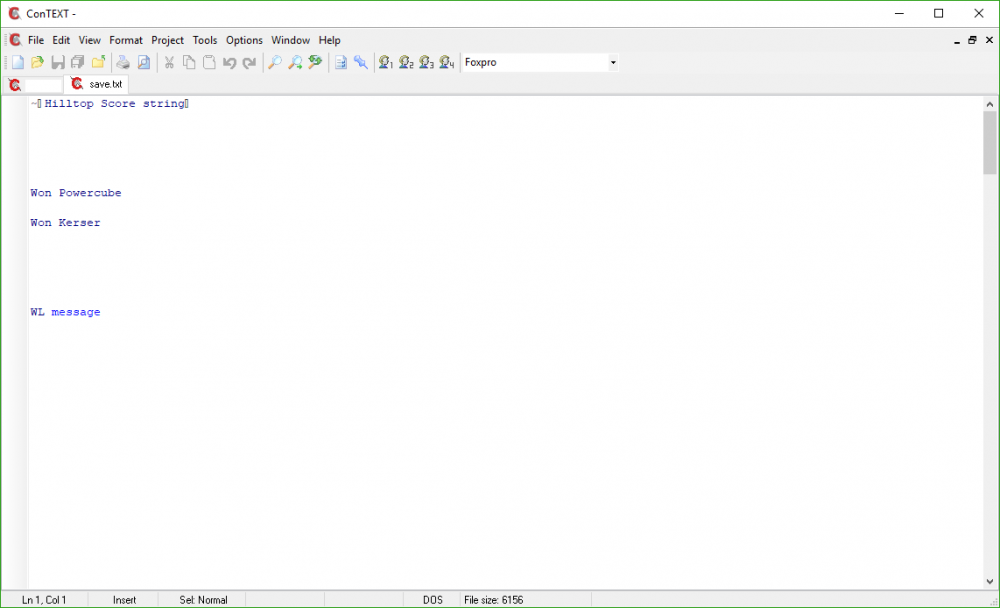
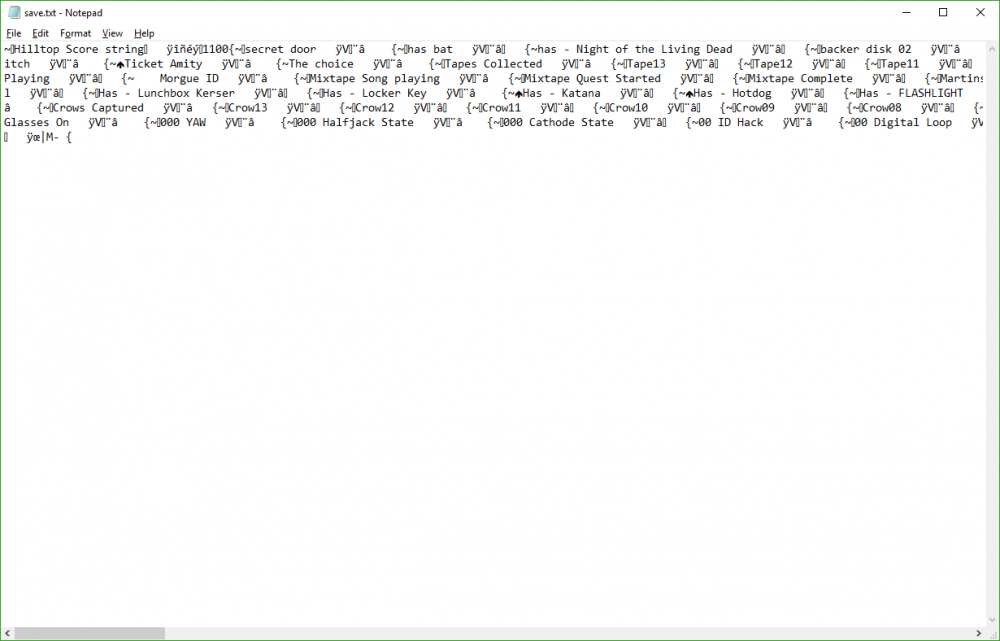
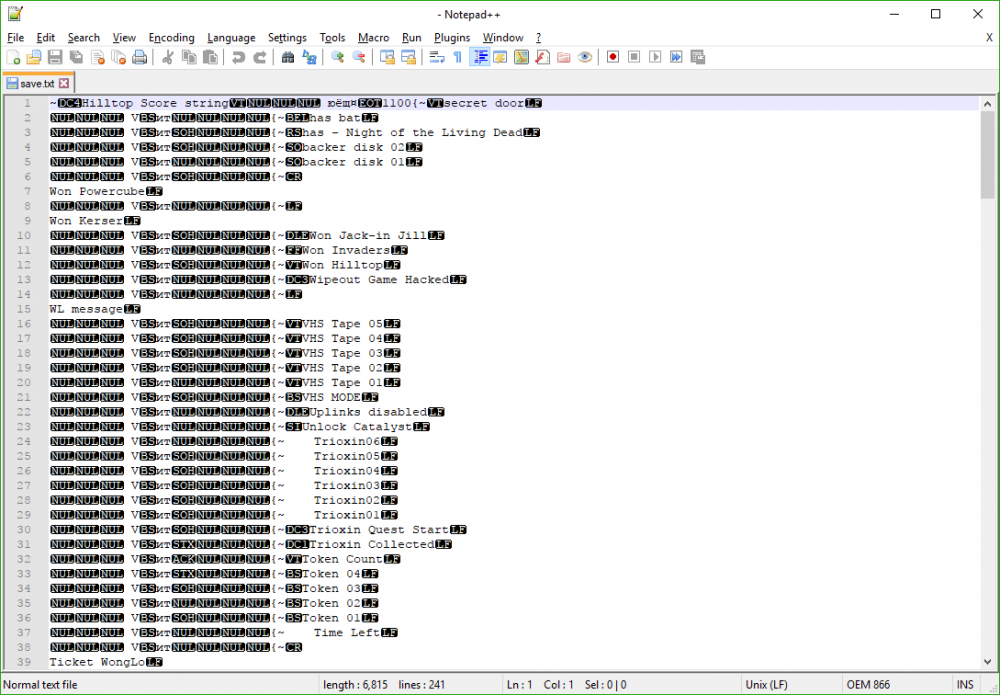
In this case, I moved a copy of my stuck save file, as it was not working due to that 1st character of ‘ý’ in the save.txt.  Using various text editors showed me varied results in the save.txt.  ConText editor showed me mostly blank space and some of the item strings; Notepad seemed to show everything, but without formatting, and Notepad++ showed me a dump of each parameter and their set flags.
Here are some screen caps from each editor showing the same file, along with the registry keys.

ConText Editor
00-ContextSave.png

Notepad (Windows standard text editor)
01-NotepadSave.png

Notepad++ 02-NotepadPlusSave.png

Registry Keys
03-RegKeys.png

Most all of this information is overkill, since I was only a couple of hours in.  To resolve the save issue I copied the broken save file to another folder and deleted it from the save folder.  Once the game made a new file, I was able to save without issue onward.  I had fun checking the save file for stuff I missed but didn’t successfully change any flags for stuff I did not find in-game.  For conversations sake, the registry values match my arcade high scores.  When my new save file was made, simply playing the games I won again, without beating my prior high score, toggled back to my high score, once I interacted with them on the fresh save.
You can migrate your save.txt and registry info to another machine, as I did on my laptop to test that I got all the save data.

If there is any take away from the thread, be sure to check files in multiple editors.  I also messaged the gave dev to say thanks for a rad game.  He noted that encrypting the save file seemed like it would have been contrary to the concept of the game.  Thanks for not doing that, because it was also fun to splunk through the save data and see how it applied to in-game content I encountered.  I’ll recap the start of the thread by saying I really enjoy this game.  Hell it was so good, I was concerned enough to figure out the intro looping issue.  Hopefully you don’t have the same issue, but if you do, it’s relatively easy to fix.

Categories
Software

SMB levels and services

Especially over the last few months, the public face of SMBv1 and how it is quite vulnerable, has become a solid talking point. If you have poked around on some Windows Servers and also some Nix file servers, you may have noticed these legacy-era protocols still running. Even if you have a more recent Windows Server Deployment, they tend to have SMB 1 enabled by default.

Oh Lordy. If you have done any nmap scans you may have also noticed there have been notifications about SMB1 for a loooong time. Lucky for us, I would like to think by disabling SMB1, all your existing systems would work. Please note the optimism, because that’s all it is if you do not confirm things still work, after having turned off SMBv1 or for that matter, any service.

Microsoft has a guide using powershell to manage these. Before you go wild, do make sure to note that SMB 2 and 3 are related and enable relevant network features too.

If you still have XP devices connecting to servers (gods save you), you will lose communication when you turn off SMB v1. Another fine reason to finally push and accomplish getting rid of those things. I think cryptolockers scared non-security people enough this year, to give your pitch some viability.

Looking at the PowerShell syntax, Windows 8 and Server 2012 have some really clean powershell cmdlets. On Windows 7, Server 2008, etc, you are essentially changing a registry key on the command line / by script. If you are rolling an Active Directory domain, you can push the SMB 1 disable out over group policy. Once again, pausing to make sure stuff works after you do this, and it would not hurt to test this in waves, as to not cause a huge problem in one fell swoop.

You can also have fun diving into some PCAPs to get a feel for SMB levels in use. You can apply filters to weed out noise from your scan. Keep good notes. I don’t know about you, but when I tell people I’m doing security maintenance, some folks like to come up with some fantasy stories of things they say worked prior. Typically stuff that never worked or something that way decommissioned months prior, not the week of your rollout.

Jolly August. Fall is creeping up :)

Just bumping as a reminder that SMB 1 natively is enabled up to and including Server 2016 test builds. Running the below may shock you in seeing that EnableSMB1Protocol is by default, set to True.

Get-SmbServerConfiguration | Select EnableSMB1Protocol, EnableSMB2Protocol

On the Windows 2012 or greater machines, you don’t have to reboot after the change, unlike the older server and workstation machines. To disable SMB1, do up the following, then re-run the check above to verify it’s off.

Set-SmbServerConfiguration -EnableSMB1Protocol $false