Ad Build Guide:
Primer: I see quite a few people talk about wanting to do vulnerability research, yet not having much Windows exposure. It could be heavy bias on my part but for the roles i have seen, Windows is pretty dominant in the wilds of the business world. The intent here is to learn more about Windows domain environments by building a test environment of our own to test on. Disclaimers apply to why we want to make a test environment: I really really really do not want to read about you getting arrested for poking a stick at some Windows environment you found in the wild, without having been granted permission to do so. It is really minor effort to find a server with Remote desktop protocol port open to the internet. Granted at this point in time, that should be considered negligence on the part of sites with that port open, but alas, that would not work as a defense for your sake.
I have intended to write this guide with a minimal technical background being required, for the sake of welcoming more people to utilize it.
Now that we got out of the way, let us start with the hardware and software used to build your Virtual Machine lab.
+ A modern desktop or laptop running an x64 processor. You can be running Windows, Linux or OS X for your desktop operating system, as we are going to use VirtualBox to build the VMs. The following guidelines can be applied to your Virtualization platform of choice, but I like VirtualBox for sake of cross-OS Virtual Machine migration and price point for running VirtualBox.
+ 16 GB RAM or more is preferable. You could get by with less but may find your VMs running low for resources and have less options for multiple, concurrent running VMs.
+ A SSD drive. Running on an SSD will greatly speed up time to copy an existing VM and also improve desktop performance of the VMs. You can get by on a HDD, but you will wait much longer to clone a virtual disk image and your virtualized desktop OS might be laggy.
Getting started, we want to install VirtualBox, make sure VT-x support is enabled (likely a BIOS setting you can set when your PC is booting up) and to download Windows Server 2016. We could go with older versions of Windows and poke those with a security stick, but if you are trying to get some viable business experience, I would jump into the more recent OS, particularly as many businesses have been lagging on their migrations from older Windows Server versions. There is no shame in learning and trying to also be marketable at the same time.
- VirtualBox:
- Windows Server 2016
Download the ISO image. https://www.microsoft.com/en-us/evalcenter/evaluate-windows-server-2016/
This will give you a 180 day trial install. So long as not doing so on the Domain Controller server with that role active, you can Sysprep the install to reset the timer and OS back to it’s initial state. More on that further in this guide.
While those download and you install VirtualBox, let’s step back to overview your intent with this test lab. We are installing an initial Windows Server 2016 virtual machine. Once that is up, we will clone that image so we have a master control image. For the sake of this lab, let’s leave the Master image intact then create 4x master clones. I’m going with 40 GB disk size for the VM, so roughly 200 GB will be used.
- Master Image (Do not change once all patched)
- Windows Domain Controller
- Microsoft SQL Server
- AppServer. This is optional if you want to save space and piggy-back your potential test application from the SQL VM.
- Client machine. Not necessarily on the domain. This will be your client device / scan box / non-domain network sniffer.
Let’s get started:
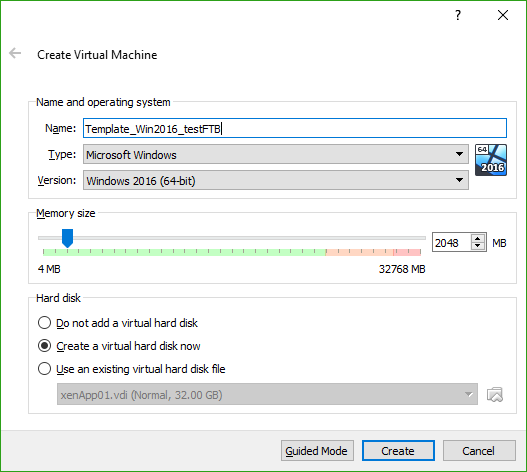
From VirtualBox, click the New button to create a new Virtual Machine. Type: Microsoft Windows, Version: Windows 2016 (x64). Name this initial VM ‘masterControlImg’ for sake of reference. Click the box for ‘Create a virtual hard disk now’. Let’s set the Memory option to ‘2048’ AKA 2 GB. Then click ‘Create’. I want to add a note that the virtual machine name you enter here will also be the subfolder in your VMs folder for VirtualBox on your storage drive (on your actual main machine). You will get weird errors if you try to make a VM the name of a folder that already is in that folder. FYI to save you headaches on that note.
Next will be the Create Virtual Hard Disk screen. Leave the path as-is since it will match the prior line about being in a folder named to your VM, ‘File size’ of 32 GB is fine (but I suggest 40 GB for when you start adding Active Directory services and Replication), ‘Hard disk file type’ to the default of VDI (VirtualBox Disk Image) is good, as is the ‘Storage on physical hard disk’ remaining set to Dynamically allocated. Good, now we can press ‘Create’ on the virtual hard disk screen.
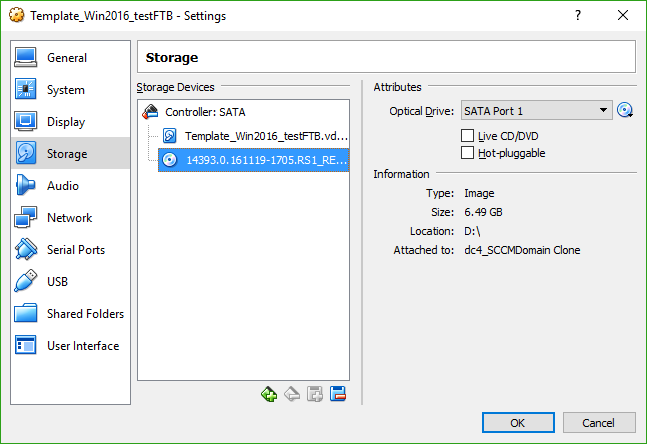
Now that VM is created, let’s go into it’s settings then onto the Storage tab. The second drive should be a CD icon and on the right side you will see a drop-down when you click the CD icon. Select ‘Virtual Optical Disk File…’ then browse on your local computer to where you saved that Windows Server 2016 ISO, click OK until you are back to your VMs listed on the ‘Oracle VM VirtualBox Manager’.
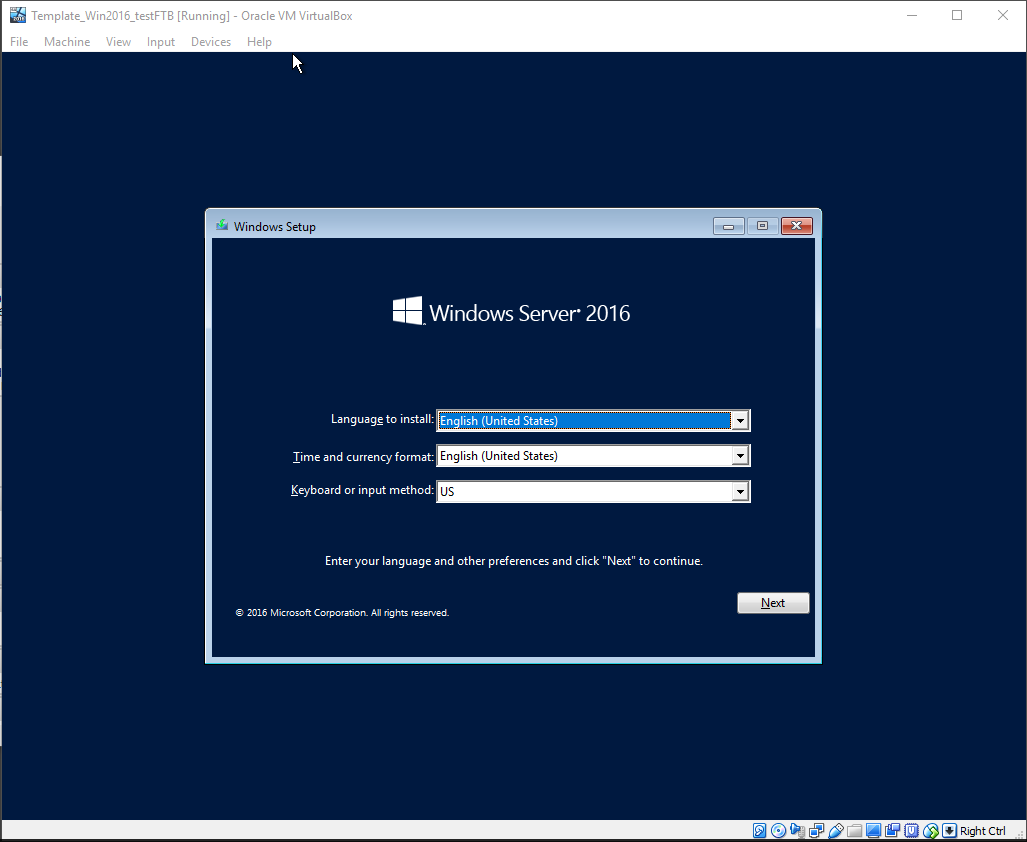
With the ISO mounted for Windows Server 2016, boot your VM to install. Hurry up and wait. Follow the prompts (you want Server 2016 with desktop experience) and select an Administrator password. For the sake of this lab, we can use ‘Babydonthurtm3!’ without the quotes.
You will want to take note of this for later use, as this is the local administrator account for this install and your cloned virtual machines. Wait for the installer to finish and when done, it will let you login and see your desktop.


Now the install process for Windows begins.


End of the Windows install process. Let us login to this VM.

Minimize Server Manager for now. We do not want to add any roles or features yet.


Clicking the Settings Gear, we want to install Updates for our Template OS.

This will likely take quite some time. Better to do it now than to need patching every other machine we make as well.

Install the most recent windows update patches, reboot and log back in. Once the patches finish, shut this VM down. Avoid booting this VM into windows, since it will be our Source VM for new instances.
Then back on the Oracle VirtualBox VM Manager, go to Settings for your VM, then Network. Change the Attached to from NAT to ‘Internal Network’. You can make a custom name for ‘intnetLab01’ for ease of reference later, if you expand your VM labs. This setting will allow all the other VMs we spawn to communicate with each other. If you forget to do this step later for other VMs, come back here if you wonder why your VM cannot see the Active Directory Domain Controller.
Clone machine image prompts:
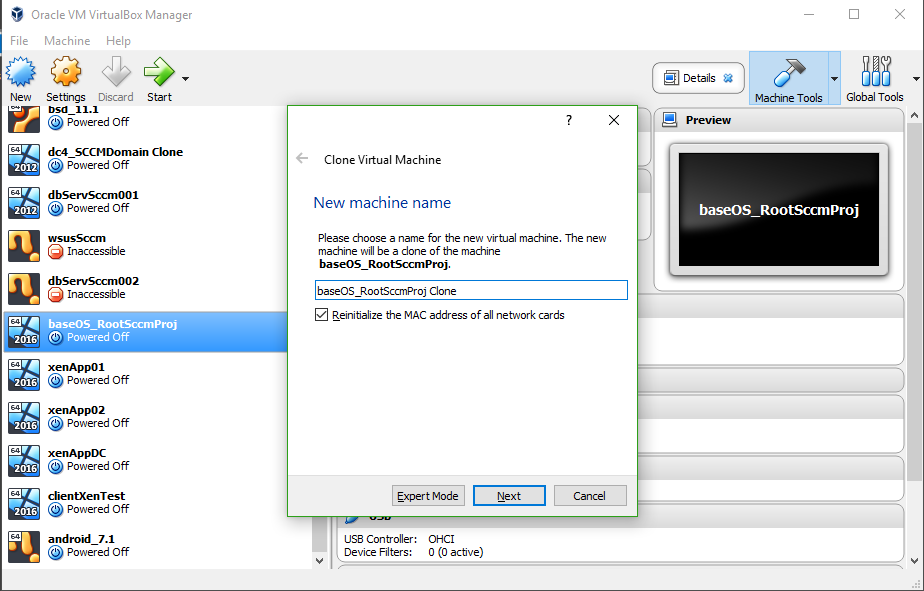
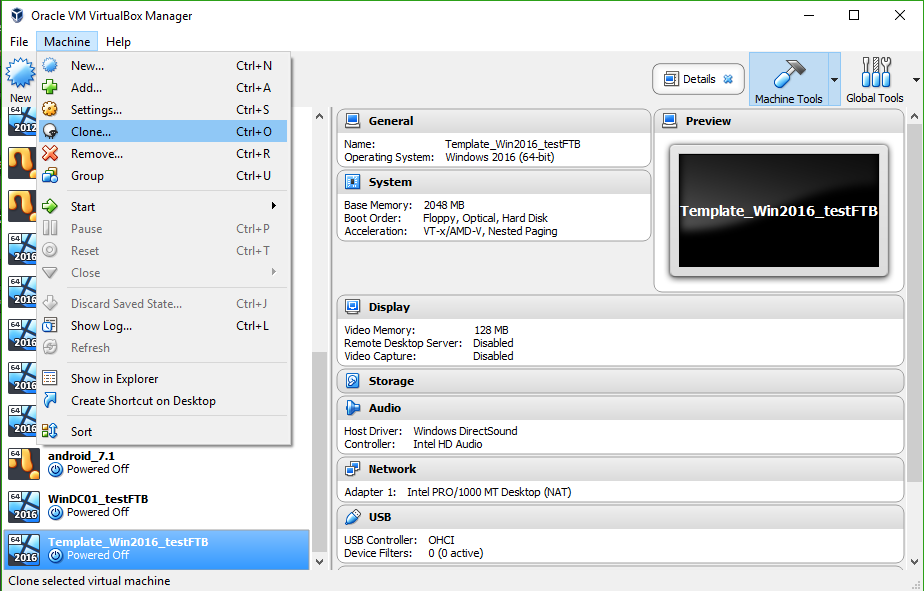
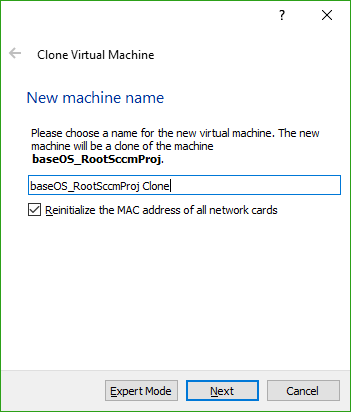


With all of this done, let’s make a clone of this VM. We will name this Clone ‘WinDC01_testFTB’ or the like, as it will be the Primary Domain Controller for our Windows Domain. Be sure to check the ‘Reinitialize the MAC address of all network cards’ because you do not want the same MAC address trying to talk to another computer. That would also cause issues with DHCP and all sorts of networking issues you do not want.
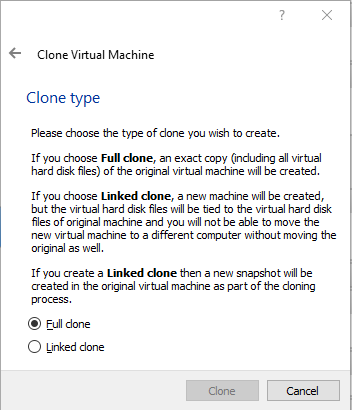
You do want to make it a Full Clone instead of a linked clone. Wait for the clone process to finish, then boot up your newly spun ‘WinDC01_testFTB’ VM.
Log in to the desktop. Before you get started making this a domain controller, we want to SysPrep this machine. The action of this command will make it seem like a new windows install with the most important result being it will have a new SID / Windows Install ID. As you dig into active directory, you will see AD links the machine name to it’s install ID / SID as a unique identifier. If that didn’t make a lot of sense, know that running Sysprep will allow us to join each of our copied VMs into this test domain, without machine conflict issues.
Click Start and then Run cmd.exe. If it’s not prefixed with ‘Administrator: Command Prompt’ in the title bar, click Start, type cmd then right-click to Run As Administrator.
In this prompt type:
cd %systemroot%\system32\sysprep

then type:
sysprep /generalize /oobe


A brief prompt will come up as it prepares your install then it will shut down the VM. Once that happens, start the VM back up and it will take you through a prompt similar to when you installed the OS. Once done, you will be back at the desktop. If it asks for an Administrator password again, take note of what you use and write it down. You are welcome to use the Haddaway example from above again.
Jumping back to the Sysprep process, you will need to do this for each image you clone from your VM template. I also wanted to mention %systemroot% that is an environmental variable in Windows. If you get to writing scripts, environmental variables are quite the blessing to your sanity. You can use them in powershell to some extent also, so the fun pays off there.
Final ramble about SysPrep. If you try to do this on an Image that had AD Roles and Features installed, it will likely not re-activate the 180 day trial for Windows Server and if it was an AD services image, it will likely error on the sysprep process. That’s why we have our base image 🙂

Let’s wrap this up getting you a domain created. Starting off, let’s set this machine to have a Static IP Address. In the TaskBar down in the lower right by the Time, right-click the Network icon and then click ‘Connections’: Ethernet. On the Ethernet status page, click Properties then Internet Protocol Version 4 (TCP/IPv4) In the screencap you can see I went with:
10.0.2.10 on a /24 Subnet (AKA 255.255.255.0)

Pick a default gateway that will be the same for all other VMs made, intended to connect to this AD setup.
For the DNS, I put it’s own IP but 127.0.0.1 (loopback) works too. If and when you add a second DNS and AD Server, I highly advise making your second DNS server be the IP of that other DC. It will make domain fail-over really easy and reliable if you shut down your primary DC or practice a patching cycle like as would be done in a production setting.
Another good thing to do, is Changing the Computer Name. By default it will be something like ‘WIN-StringofTextandNumbers’. For sanity’s sake you can rename this to ‘WinDC01FTB’ or something more descriptive. To change the computer name, bring up an Explorer window then right-click on ‘This PC’ then select Properties. Click Change Settings to change the Computer name, then reboot as it will ask you to do.

When you run the AD wizard without setting a static IP address, it will give you a warning about resolution issues. So that’s why we took care of that before using the Server Manager to add roles and features. Take my word on it being annoying to change a computer name, once you add roles and services. Planning to do the PC name change before adding roles will save you headaches.
Since we are in VirtualBox, select Devices menu then the ‘Insert Guest Additions CD Image’ if you would like to use options such as ‘Shared Clipboard’ and ‘Drag and Drop’ files. Once the image is mounted in your VM, run the installer from it’s CD drive then reboot when it’s finished as it will prompt. This is helpful for when you want to get or send files and text to the VM and your actual desktop machine. Unless you like manually retyping scripts, I’d suggest adding these Guest Addons.
Wrapping this guide up, I am pivoting to a helpful guide for Installing AD Services:
http://www.rebeladmin.com/2016/10/step-step-guide-setup-active-directory-windows-server-2016/
Jump to Step 4 and it will show you click for click on adding the Active Directory Domain Services under Server Manager | Roles and Features.
I am going to present a bit of a shortcut / cheat. Instead of clicking lots of next boxes, we can supply the config options by use of Powershell. The below is the script I saved from the Wizard when it presented ‘Export Configuration Settings’. You can run this in a Powershell ISE window or save it to a text file and add a .ps1 on the name to make it a powershell script.
#
# Windows AD DS Deployment
#
Import-Module ADDSDeployment
Install-ADDSForest `
-CreateDnsDelegation:$false `
-DatabasePath "C:\Windows\NTDS" `
-DomainMode "WinThreshold" `
-DomainName "hivelan.int" `
-DomainNetbiosName "HIVELAN" `
-ForestMode "WinThreshold" `
-InstallDns:$true `
-LogPath "C:\Windows\NTDS" `
-NoRebootOnCompletion:$false `
-SysvolPath "C:\Windows\SYSVOL" `
-Force:$true

This should let you spawn your Domain as if you entered these values in the Wizard. In this setup we are calling the domain ‘Hivelan.int’, with a classic domain name of just Hivelan (for Window NT level old support). On a reboot you should be able to login to the Domain you just created.
From here, the virtual domain is your oyster. You can make another clone of your Template machine, sysprep it, then join it to the domain. Since we didn’t add the DHCP Server role to the current DC, go into your IP options and set all the IP info the same, except the IP address where you want the last octet (4th block of 3 digits) to be different than .10.
Then once on the same IP Space (your 255.255.255.0 subnet, means you can have an IP of 10.0.2.1 – 10.0.2.254). Go into System Properties on this new VM. Change your Computer name if you wish but the real objective is to change from a Workgroup to a Domain. Enter ‘Hivelan.int’ as your domain and it should prompt for the Administrator account and Password. You can always make a second domain admin account if you wish, but that boils into using Active Directory Users and Computers in Administrative Tools.
Once you add this machine to the domain and reboot, jump back into the Server Manager to add the Active Directory Domain Services on this machine, but we will say ‘Add to an existing domain’. Click Next until it’s finished.
This guide got a little longer than I intended but I will stop here for the time being. You can then make another clone of your Template VM and use that as a machine not on the domain. Give it an IP address in the allotted space and you can use that for running Wireshark to see what kind of traffic you see. You can then add that machine to the domain or make another VM clone to see how the traffic differs for a machine that is added to the domain.
Hopefully that helped get you into a test Windows environment and gave some help on getting started with VirtualBox. If you have the funding and another Virtual Machine platform you like more (like XenServer or VMware), most of the concepts and options should be transferable and have similar naming.